この記事はバージョン Spring ’26 において執筆しています。
現在の動作と異なる場合がありますので、ご認識おきください。
Agentforceのエージェントにリッチなユーザーインターフェース(UI)を持たせる際、Agent ScriptとCustomLightningTypes(Lightning Type Bundle)を連携させるのが現在の標準的なアプローチです。この構成により、プロンプトに依存した不安定な描画を避け、型安全なデータの受け渡しに基づく決定論的なUI構築が可能になります。
本記事では、ユーザーに情報入力を促す「入力フォーム(Input)」と、エージェントの処理結果を表示する「出力カード(Output)」の両方の実装アーキテクチャと手順を解説します。
4層アーキテクチャと連携構造
公式ドキュメント(Agent Script Recipes)の仕様に基づき、InputとOutputのそれぞれが、Apexクラス、Agent Script、Lightning Type Bundle、LWCの4層でどのように連携するかを以下の図式に整理しました。
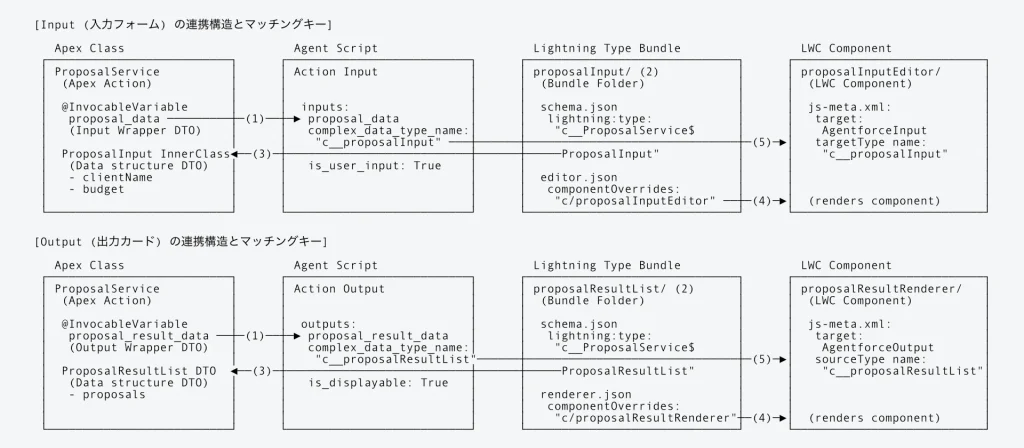
図の矢印(◄──►)や名称が一致している部分が、データ型やコンポーネントの名前解決でそれぞれ紐づいている箇所です。
入力と出力では、Apexのデータ定義、Agent Scriptのフラグ(is_user_input と is_displayable)および型名、Lightning Type Bundleで定義するJSONファイル(editor.json と renderer.json)、そしてLWCのターゲット(AgentforceInput と AgentforceOutput)が明確に異なります。
暗黙的なルーティングとマッチング規則
Agent Scriptの complex_data_type_name から最終的なUI(LWC)にたどり着くまでのプロセスは、コードによる明示的な関数の呼び出しではなく、Salesforce内部の「名前解決(ネーミング・レゾリューション)」と「フラグによる分岐」という仕様によってルーティングされています。
この仕組みは暗黙的な命名規約に依存しているため最初はブラックボックスに感じられがちですが、実際には非常にシンプルで厳格な「マッチング(一致)の連鎖」で構築されています。
🔑 名前解決のマッチング規則一覧
名前解決が成功するために、どの設定ファイルのどのキーが一致している必要があるかを以下の表に整理しました。
| 連携フェーズ | マッチング元(定義場所) | マッチング先(定義場所) | 完全一致すべきキーワードの例 | 補足・エラー時の挙動 |
|---|---|---|---|---|
| ① Apex引数 ↔ Agent Script | Apexアクション引数のプロパティ名 ( ProposalRequest.proposal_data) | Agent Scriptのアクション入力名 ( inputs: proposal_data) | proposal_data | 不一致の場合、エージェントがアクションを実行する際に入力値を正しく渡せなくなります。 |
| ② Agent Script ↔ Bundle | Agent Scriptのカスタム型名 ( complex_data_type_name) | Lightning Type Bundleのフォルダ名 ( force-app/.../lightningTypes/) | proposalInput(型名 c__proposalInput からプレフィックス c__ を除いたもの) | フォルダ名が異なると、システムは中継定義を見失い、LWCではなくプレーンテキストで表示されます。 |
| ③ Bundle ↔ Apex DTO | Bundleの型スキーマ ( schema.json: lightning:type) | ApexのDTOクラス名 ( ProposalService.ProposalInput) | @apexClassType/c__ProposalService$ProposalInput | Apexクラス内のプロパティ構造とLWC間でデータバインドを行うための核心的な紐付けです。 |
| ④ Bundle ↔ LWC | BundleのUIオーバーライド定義 ( editor.json/renderer.json) | LWCコンポーネントのフォルダ名 ( force-app/.../lwc/) | c/proposalInputEditor(出力時は c/proposalResultRenderer) | レンダリングする対象のLWCコンポーネントを特定します。 |
| ⑤ LWC ↔ Agent Script | LWCのメタデータXMLの型定義 ( targetType または sourceType) | Agent Scriptのカスタム型名 ( complex_data_type_name) | c__proposalInput(出力時は c__proposalResultList) | これが一致しないと、安全なデータバインドが確立されず、LWCにデータが流れなくなります。 |
システムはこれらの一致を確認しながら、Agent Script → Bundle(中継地点) → LWC の順で経路をたどり、最終的にLWCを描画して安全なデータ通信(バインディング)を確立します。
Input / Output の実装手順(サンプル)
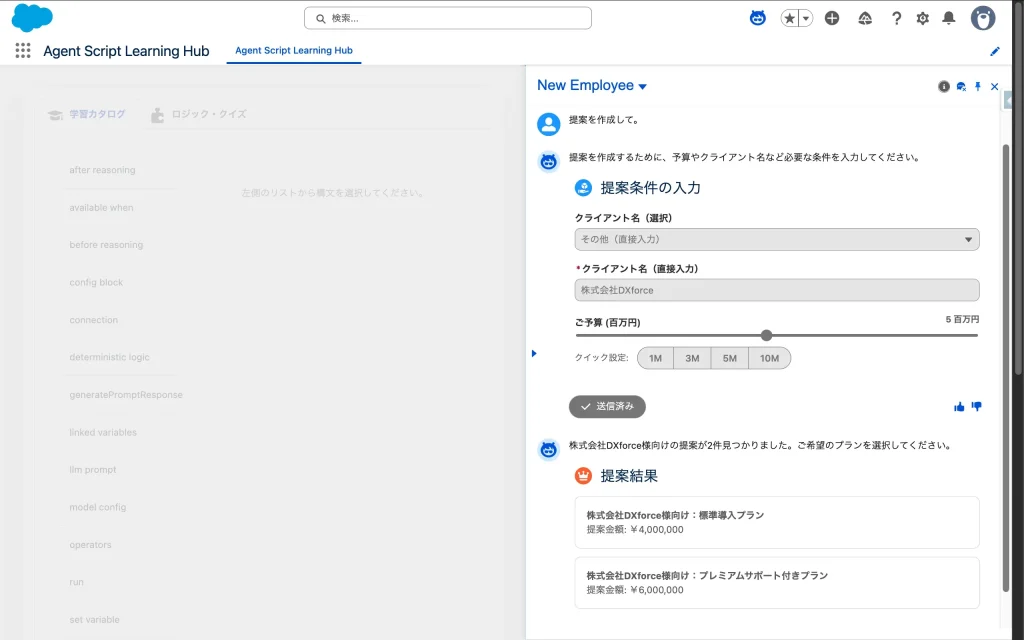
ここでは、「提案」をEmployee Agentに依頼するための入力フォーム(Input)と、生成された提案内容を表示する出力カード(Output)の構成をサンプルとして実装します。
今回の記事で作成したコンポーネントの全ソースコードをGitHubで公開しています。 ぜひ Clone して、あなたの組織で動かしてみてください。

ステップ1: Apexデータ型の定義とアクションの実装
LWCとAgent Script間で受け渡しを行うデータの型と、エージェントから呼び出されるApexアクションを定義します。Agent Scriptのパラメータバインド構造に対応するため、単一の引数リストではなく ProposalRequest と ProposalResponse によるラッパー構造を採用しています。
ProposalService.cls
// Agent ScriptおよびLWC間で受け渡しを行うデータ構造を定義したサービスクラス
@JsonAccess(serializable='always' deserializable='always')
public with sharing class ProposalService {

    // 1. 入力DTO
    @JsonAccess(serializable='always' deserializable='always')
    public class ProposalInput {
        @InvocableVariable(label='Client Name' description='Client Name' required=true)
        @AuraEnabled
        public String clientName;

        @InvocableVariable(label='Budget' description='Budget')
        @AuraEnabled
        public Decimal budget;
    }

    // 2. 出力DTO
    @JsonAccess(serializable='always' deserializable='always')
    public class ProposalResult {
        @InvocableVariable(label='Proposal ID' description='Unique identifier')
        @AuraEnabled
        public String proposalId;

        @InvocableVariable(label='Proposal Name' description='Proposal name')
        @AuraEnabled
        public String proposalName;

        @InvocableVariable(label='Amount' description='Amount')
        @AuraEnabled
        public Decimal amount;
    }

    @JsonAccess(serializable='always' deserializable='always')
    public class ProposalResultList {
        @InvocableVariable(label='Proposals')
        @AuraEnabled
        public List<ProposalResult> proposals;
    }

    // 3. アクション用リクエストラッパー
    @JsonAccess(serializable='always' deserializable='always')
    public class ProposalRequest {
        @InvocableVariable(label='Proposal Data' required=true)
        @AuraEnabled
        public ProposalInput proposal_data;
    }

    // 4. アクション用レスポンスラッパー
    @JsonAccess(serializable='always' deserializable='always')
    public class ProposalResponse {
        @InvocableVariable(label='Proposal Result Data')
        @AuraEnabled
        public ProposalResultList proposal_result_data;
    }

    // 5. アクション本体: エージェントから呼び出される実際のアクションメソッド
    @InvocableMethod(label='Get Proposal')
    public static List<ProposalResponse> getProposal(List<ProposalRequest> requests) {
        List<ProposalResponse> responses = new List<ProposalResponse>();

        for (ProposalRequest req : requests) {
            ProposalResponse resp = new ProposalResponse();
            resp.proposal_result_data = new ProposalResultList();
            resp.proposal_result_data.proposals = new List<ProposalResult>();

            ProposalInput input = req.proposal_data;
            if (input != null) {
                // 本来はSOQLを実行しますが、本サンプルでは入力値に応じた固定値を生成します
                String targetClient = String.isNotBlank(input.clientName) ? input.clientName : '新規顧客';
                Decimal baseAmount = input.budget != null ? input.budget : 1000000;

                ProposalResult res1 = new ProposalResult();
                res1.proposalId = 'PRP-001';
                res1.proposalName = targetClient + '様向け:標準導入プラン';
                res1.amount = baseAmount * 0.8;
                resp.proposal_result_data.proposals.add(res1);

                ProposalResult res2 = new ProposalResult();
                res2.proposalId = 'PRP-002';
                res2.proposalName = targetClient + '様向け:プレミアムサポート付きプラン';
                res2.amount = baseAmount * 1.2;
                resp.proposal_result_data.proposals.add(res2);
            }

            responses.add(resp);
        }

        return responses;
    }
}Apex DTOへの @JsonAccess と @AuraEnabled のダブル付与
Agentforce アクションで complex_data_type_name(カスタムデータ型)を使用する場合、Apexクラスとインナークラスに @JsonAccess(serializable='always' deserializable='always') を明示しないと、プラットフォームとの通信時にシリアライズ・デシリアライズに失敗します。結果としてチャット画面上でUIがロードされないか、アクションの実行そのものがエラーになります。
また、そのデータを表示・処理するLWC側で JavaScript がプロパティを参照するためには、各変数に @AuraEnabled が付与されている必要があります。必ず「両方書く」ことを忘れないように注意してください。
ステップ2: 入出力用LWCの作成
入力用LWC(Input)の作成
エージェントがユーザーに情報を要求する際に表示される入力フォームを作成します。今回は単なるテキスト入力ではなく、LWCの強みを活かしたリッチなUIコントロール(ドロップダウンやスライダー)を実装します。
また、各入力要素に value={clientName} などをバインドすることで、エージェントが会話履歴から初期値を推論・自動注入した際に、画面へ正しく初期値が描画されるように構成しています。
proposalInputEditor.html
<template>
    <div class="slds-var-m-vertical_small">
        <lightning-card title="提案条件の入力" icon-name="standard:proposition">
            <div class="slds-var-p-vertical_xx-small">
                <!-- クライアント名の選択 -->
                <lightning-combobox
                    name="clientOption"
                    label="クライアント名(選択)"
                    value={clientOption}
                    options={clientOptions}
                    onchange={handleClientChange}
                    disabled={readOnly}>
                </lightning-combobox>

                <!-- 「その他」選択時に表示されるテキスト入力 -->
                <template if:true={isCustomClient}>
                    <lightning-input
                        type="text"
                        label="クライアント名(直接入力)"
                        value={clientName}
                        onchange={handleCustomClientChange}
                        disabled={readOnly}
                        class="slds-var-m-top_small"
                        required>
                    </lightning-input>
                </template>

                <!-- 予算の入力(スライダー:単位 百万円) -->
                <div class="slds-var-m-top_medium">
                    <div class="slds-form-element">
                        <div class="slds-grid slds-grid_align-spread slds-var-m-bottom_xx-small">
                            <label class="slds-form-element__label slds-m-bottom_none" for="budget-slider">ご予算 (百万円)</label>
                            <span class="slds-text-title_bold">{budgetInMillions} 百万円</span>
                        </div>
                        <div class="slds-form-element__control">
                            <div class="slds-slider">
                                <input
                                    type="range"
                                    id="budget-slider"
                                    class="slds-slider__range"
                                    min="0.5"
                                    max="10"
                                    step="0.5"
                                    value={budgetInMillions}
                                    oninput={handleBudgetInput}
                                    onchange={handleBudgetChange}
                                    disabled={readOnly}
                                />
                            </div>
                        </div>
                    </div>
                </div>

                <!-- クイック選択タグ -->
                <div class="slds-var-m-top_small slds-var-m-bottom_small">
                    <span class="slds-text-title slds-var-m-right_small">クイック設定:</span>
                    <lightning-button-group>
                        <lightning-button label="1M" data-amount="1000000" onclick={handleQuickBudget} disabled={readOnly} variant="neutral"></lightning-button>
                        <lightning-button label="3M" data-amount="3000000" onclick={handleQuickBudget} disabled={readOnly} variant="neutral"></lightning-button>
                        <lightning-button label="5M" data-amount="5000000" onclick={handleQuickBudget} disabled={readOnly} variant="neutral"></lightning-button>
                        <lightning-button label="10M" data-amount="10000000" onclick={handleQuickBudget} disabled={readOnly} variant="neutral"></lightning-button>
                    </lightning-button-group>
                </div>
            </div>
        </lightning-card>
    </div>
</template>入力フォームの readOnly 制御と送信ボタンについて
Agentforceは、ユーザーとの会話ターンが終了して次のステップに進む際、チャット履歴に残る過去のLWCコンポーネントに対して自動的に @api readOnly = true を渡して再描画します。
この仕様に対応するため、HTML側で disabled={readOnly} を設定し、過去のフォームからの意図しない valuechange イベント発火を防ぐ実装が必須です。また、状態の同期はイベントでリアルタイムに行われるため、LWC内に独自の「送信(Submit)ボタン」を配置する必要はありません。
proposalInputEditor.js
import { LightningElement, api } from 'lwc';

// 公式レシピの仕様に準拠しつつ、実務要件(readOnly対応等)とリッチなUIコントロールを統合したコンポーネント
export default class ProposalInputEditor extends LightningElement {
    @api readOnly = false; // 会話ターン終了後の無効化フラグ

    // 内部変数として状態を管理
    clientName = '';
    budget = 1000000;

    // UIの状態管理用プロパティ
    clientOption = '';
    isCustomClient = false;
    sliderValue = 1;

    // 選択肢の定義
    get clientOptions() {
        return [
            { label: '株式会社セールスフォース・ジャパン', value: '株式会社セールスフォース・ジャパン' },
            { label: 'トヨタ自動車株式会社', value: 'トヨタ自動車株式会社' },
            { label: 'ソニーグループ株式会社', value: 'ソニーグループ株式会社' },
            { label: 'その他(直接入力)', value: 'custom' }
        ];
    }

    // スライダー表示用に百万円単位の値を取得するゲッター
    get budgetInMillions() {
        return this.sliderValue;
    }

    // エージェントからの初期値注入(過去のターンの再描画や推論値のセット)に対応
    @api
    get value() {
        return {
            clientName: this.clientName,
            budget: this.budget
        };
    }
    set value(val) {
        if (val) {
            this.clientName = val.clientName || '';
            this.budget = val.budget || 1000000;
            this.sliderValue = this.budget / 1000000;

            // 注入された値が既存の選択肢にあるか判定
            const match = this.clientOptions.find(opt => opt.value === this.clientName);
            if (match) {
                this.clientOption = this.clientName;
                this.isCustomClient = false;
            } else if (this.clientName) {
                this.clientOption = 'custom';
                this.isCustomClient = true;
            } else {
                this.clientOption = '';
                this.isCustomClient = false;
            }
        }
    }

    // クライアント名の選択(ドロップダウン)変更イベント
    handleClientChange(event) {
        event.stopPropagation();
        if (this.readOnly) return;

        const val = event.detail.value;
        this.clientOption = val;

        if (val === 'custom') {
            this.isCustomClient = true;
            this.clientName = ''; // クリアして直接入力させる
        } else {
            this.isCustomClient = false;
            this.clientName = val;
            this.notifyChange();
        }
    }

    // 「その他」選択時の直接入力テキストフィールド変更イベント
    handleCustomClientChange(event) {
        event.stopPropagation();
        if (this.readOnly) return;
        this.clientName = event.target.value;
        this.notifyChange();
    }

    // スライダーのリアルタイムドラッグ用イベント(ラベル更新のみ)
    handleBudgetInput(event) {
        event.stopPropagation();
        this.sliderValue = Number(event.target.value);
    }

    // 予算スライダー変更確定イベント
    handleBudgetChange(event) {
        event.stopPropagation();
        if (this.readOnly) return;
        this.budget = Number(event.target.value) * 1000000;
        this.notifyChange();
    }

    // クイック設定ボタンクリックイベント
    handleQuickBudget(event) {
        event.stopPropagation();
        if (this.readOnly) return;
        const amount = Number(event.target.dataset.amount);
        this.budget = amount;
        this.sliderValue = amount / 1000000;
        this.notifyChange();
    }

    // 変更内容をAgentforceへ通知する共通メソッド
    notifyChange() {
        this.dispatchEvent(
            new CustomEvent('valuechange', {
                detail: {
                    value: {
                        clientName: this.clientName,
                        budget: this.budget
                    }
                }
            })
        );
    }
}
proposalInputEditor.js-meta.xml
<?xml version="1.0" encoding="UTF-8"?>
<LightningComponentBundle xmlns="[http://soap.sforce.com/2006/04/metadata](http://soap.sforce.com/2006/04/metadata)">
    <apiVersion>66.0</apiVersion>
    <isExposed>true</isExposed>
    <targets>
        <target>lightning__AgentforceInput</target>
    </targets>
    <targetConfigs>
        <targetConfig targets="lightning__AgentforceInput">
            <targetType name="c__proposalInput"/>
        </targetConfig>
    </targetConfigs>
</LightningComponentBundle>
出力用LWC(Output)の作成
エージェントの処理結果を表示するためのカードを作成します。金額表示には lightning-formatted-number を使用し、日本円の通貨フォーマットでリッチに表示させます。
proposalResultRenderer.html
<template>
    <template lwc:if={hasResults}>
        <div class="slds-var-m-vertical_small">
            <lightning-card title="提案結果" icon-name="standard:opportunity">
                <ul class="slds-var-m-top_medium slds-var-p-bottom_xx-small">
                    <template for:each={results} for:item="res">
                        <li key={res.proposalId} class="slds-box slds-var-m-bottom_small">
                            <p><strong>{res.proposalName}</strong></p>
                            <p>提案金額: <lightning-formatted-number value={res.amount} format-style="currency" currency-code="JPY"></lightning-formatted-number></p>
                        </li>
                    </template>
                </ul>
            </lightning-card>
        </div>
    </template>
</template>
proposalResultRenderer.js
import { LightningElement, api } from 'lwc';

// 配列データの揺らぎに対応した出力コンポーネント
export default class ProposalResultRenderer extends LightningElement {
    @api value;

    // Agentforceからのデータ注入構造を吸収する
    get results() {
        if (!this.value) {
            // プレビュー表示用、またはデータ未設定時のフォールバックデータ
            return [
                {
                    proposalId: 'PREVIEW-001',
                    proposalName: '【プレビュー】標準プラン(サンプル)',
                    amount: 1200000
                },
                {
                    proposalId: 'PREVIEW-002',
                    proposalName: '【プレビュー】プレミアムプラン(サンプル)',
                    amount: 1800000
                }
            ];
        }
        if (this.value.proposals && Array.isArray(this.value.proposals)) {
            return this.value.proposals;
        }
        if (Array.isArray(this.value)) {
            return this.value;
        }
        if (this.value.output && Array.isArray(this.value.output)) {
            return this.value.output;
        }
        if (typeof this.value === 'object') {
            return [this.value];
        }
        return [];
    }

    get hasResults() {
        return this.results && this.results.length > 0;
    }
}LWC出力カードでの「ビルダープレビュー表示」対応とデータ構造の揺らぎ
LWCを Lightning アプリケーションビルダー(App Builder)やチャットプレビューなどに配置する際、まだエージェントからデータ(@api value)が渡されていない初期状態でコンポーネントがレンダリングされることがあります。
もし results() ゲッターが this.value の存在を前提に書かれていると、ヌルポインタエラーで画面がクラッシュし、ビルダーで配置できなくなります。上記サンプルのように、if (!this.value) { return [ ...プレビューデータ... ]; } としてプレビュー用のモックデータをフォールバックとして用意しておく実装パターンは、実務開発において非常に重要なTipsです。
また、プラットフォームのシリアライズ仕様により、データ構造がラッパー型({ proposals: [...] })になったり、生の配列([...])になったり、output キーで包まれたりと変動するケースがあります。これらすべてのパターンをゲッター内で判定し、適切に配列を展開する「ディフェンシブ・プログラミング」が本番運用では不可欠です。
proposalResultRenderer.js-meta.xml
<?xml version="1.0" encoding="UTF-8"?>
<LightningComponentBundle xmlns="[http://soap.sforce.com/2006/04/metadata](http://soap.sforce.com/2006/04/metadata)">
    <apiVersion>66.0</apiVersion>
    <isExposed>true</isExposed>
    <targets>
        <target>lightning__AgentforceOutput</target>
    </targets>
    <targetConfigs>
        <targetConfig targets="lightning__AgentforceOutput">
            <sourceType name="c__proposalResultList"></sourceType>
        </targetConfig>
    </targetConfigs>
</LightningComponentBundle>
ステップ3: Lightning Type Bundleの構成
InputとOutputそれぞれに対応するフォルダと設定ファイルを作成します。UIをオーバーライドする設定ファイル(editor.json / renderer.json)は、対象チャネルのフォルダ内に配置します。
Input側の設定 (proposalInputフォルダ内)
proposalInput/schema.json
{
  "title" : "Proposal Input",
  "lightning:type" : "@apexClassType/c__ProposalService$ProposalInput"
}
proposalInput/lightningDesktopGenAi/editor.json
{
  "editor" : {
    "componentOverrides" : {
      "$" : {
        "definition" : "c/proposalInputEditor"
      }
    }
  }
}
Output側の設定 (proposalResultフォルダ内)
proposalResultList/schema.json
{
  "title" : "Proposal Result List",
  "lightning:type" : "@apexClassType/c__ProposalService$ProposalResultList"
}
proposalResultList/lightningDesktopGenAi/renderer.json
{
  "renderer" : {
    "componentOverrides" : {
      "$" : {
        "definition" : "c/proposalResultRenderer"
      }
    }
  }
}
補足:展開するチャネルによるフォルダ構成の違い
Lightning Type Bundleにおいて、UI定義ファイルを配置するディレクトリ名は、エージェントを展開する「チャネル」によって厳密に決定されます。
今回のサンプルでは社内ユーザーがLightning Experience上で利用する「Employee Agent」を想定しているため、lightningDesktopGenAi フォルダを使用しました。外部の顧客がWebサイトのチャット(MIAW)から利用する「Service Agent」を構築する場合は、以下の通りフォルダ名が異なります。
- Employee Agent (社内コンソール向け)
使用ディレクトリ:lightningDesktopGenAi/ - Service Agent(社外顧客向け / Web・アプリ内メッセージング)
使用ディレクトリ:enhancedWebChat/
この仕様により、同一のデータ構造(schema.json)に対して、社内用(詳細な情報)と社外用(シンプルな情報)で異なるLWCコンポーネントを出し分ける柔軟なアーキテクチャを実現可能です。
Experience Cloud サイトで LightningTypeBundleを使用するには、拡張チャットをv2にする必要があります。v2のメリットやv1との違いなど詳細はこちらをご覧ください。

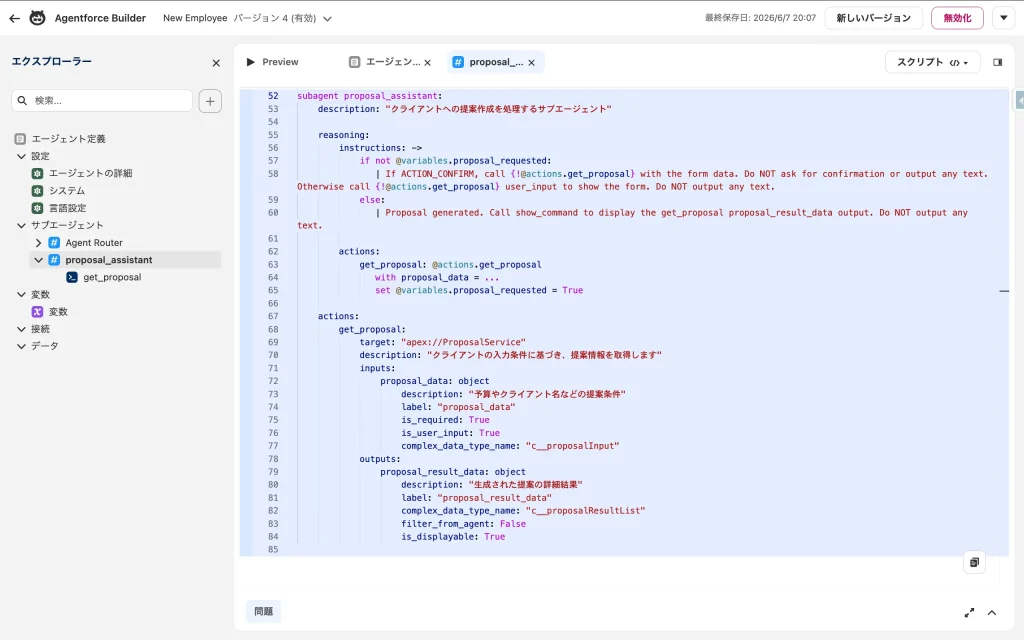
ステップ4: Agent Scriptの定義
最後に、Agent Script(.agent ファイル)内で状態(variables)、インストラクション、アクションを宣言します。画面表示フローを制御する状態管理変数 proposal_requested を定義し、インストラクション内に条件分岐を含めることで、結果表示まで決定論的にコントロールする実運用向けの実装です。
(省略)

# 状態管理用の変数 (提案作成が完了したかのフラグ)
variables:
    proposal_requested: mutable boolean = False

(省略)

# サブエージェントの定義
subagent proposal_assistant:
    description: "クライアントへの提案作成を処理するサブエージェント"

    reasoning:
        instructions: ->
            if not @variables.proposal_requested:
               | If ACTION_CONFIRM, call {!@actions.get_proposal} with the form data. Do NOT ask for confirmation or output any text. Otherwise call {!@actions.get_proposal} user_input to show the form. Do NOT output any text.
            else:
               | Proposal generated. Call show_command to display the get_proposal proposal_result_data output. Do NOT output any text.

        actions:
            get_proposal: @actions.get_proposal
               with proposal_data = ...
               set @variables.proposal_requested = True

    actions:
        get_proposal:
            target: "apex://ProposalService"
            description: "クライアントの入力条件に基づき、提案情報を取得します"
            inputs:
                proposal_data: object
                    description: "予算やクライアント名などの提案条件"
                    label: "proposal_data"
                    is_required: True
                    is_user_input: True
                    complex_data_type_name: "c__proposalInput"
            outputs:
                proposal_result_data: object
                    description: "生成された提案の詳細結果"
                    label: "proposal_result_data"
                    complex_data_type_name: "c__proposalResultList"
                    filter_from_agent: False
is_displayable: TrueLWCの動作確認は実際の画面で行う
Agentforce Builderでは、仕様上プレビューでLWCを表示することができません。
LWCフォームなどを動作確認したい時は一度エージェントを有効化してから実際の画面で確認しましょう。
実装における整合性の担保
Custom Lightning Type の解決は暗黙的な命名解決に依存しているため、1文字でも大文字・小文字が異なると動作しません。
特に以下の表の通り、名前空間のプレフィックス(c__)が必要な箇所と不要な箇所が入り乱れます。 実装時やデバッグ時は、各設定が以下の規則に準拠しているか、対比表を見ながら最優先で確認してください。
| 設定ファイル / 項目 | プレフィックス指定 | 記述例 |
|---|---|---|
Agent Script (complex_data_type_name) | 必要 | c__proposalInput |
| Lightning Type Bundle (フォルダ・メタデータ名) | 不要 | proposalInput |
LWCメタデータ (<targetType name="...">) | 必要 | c__proposalInput |
これらの値に相違があると、標準テキストへのフォールバックが発生するか、コンポーネントが描画されないサイレントエラーとなります。デバッグ時間を劇的に削減するためにも、このアライメント規則をチーム内で共有することをおすすめします。
参考URL
CustomLightningTypes | Agent Script Recipes

lightning__AgentforceInput Target | Lightning Web Components Developer Guide

lightning__AgentforceOutput Target | Lightning Web Components Developer Guide

Core Concepts of Custom Lightning Types | Lightning Types Developer Guide


読者の声